


Whilst capturing the action is the obvious main job of a sports photographer, getting your photos out to the world as quickly as possible is equally, if not more important. In this post I will go through my sports photographer workflow, which is a process that needs to be constantly evolving to ensure you are working as quickly and effectively as possible.
In this post I will go through my current workflow, the tools and software I use to make sure my photos are getting out into the world as quickly as possible.
Packing My Bag
My camera bag for sports varies slightly depending on what sport I’m covering, but generally I’ll have the following bits with me:
- Nikon Z9 Body x2
- Nikon FTZ adapter x2
- Nikon Z 24-70mm f/2.8 S
- Nikon Z 70-200mm f/2.8 S
- Nikon AF-S 400MM f/2.8E FL ED VR
- Benro MSD46C SupaDupa Carbon Fibre Monopod
- Think Tank Hydrophobia Rain Covers
If I am shooting football (soccer), I will also have a remote camera set up:
- Nikon Z6 Body
- Nikon 14-24mm f/2.8
- Pocketwizard Plus III triggers
- Godox MT-01 Mini Tripod
For tennis/netball I also use:
- Nikon 105mm f/1.4
- Nikon 300mm f/2.8
- Nikon 50mm f/1.2 Z
I use a 2023 Macbook 14″ M2 Pro, 32gb ram laptop, which runs for at least 7 hours with all of my software running which is more than capable of handling as many raw files as I can throw at it.
In addition, I also pack a Wooshade screen shade and a little laptop clamp that I can mount to my Pelican 1535 Air Case to create a workstation.
Before Kick Off
My first step is make sure I have a location to shoot and edit from, for some sports (Rugby, Netball, Tennis as a few examples) I will be able to roam around the venue as the match is underway, so I will find a location as close to the field of play as possible, whilst mindful not to be in the way of any match day operations, or broadcast cameras.
Most of my sports work is for photo agencies, with an expectation of filing images through the match so that news websites, publications and clients can use my photos as the match is happening. For most sports I will aim to arrive at the venue 90-120 minutes before kick off, this way I can make sure everything is set and ready to go with lots of time before the fun begins. Firstly I make sure I can connect to the internet either by using the venues wifi, or by using a 5g hotspot from my phone.
Once I’m connected I read up on as much match day information as possible so I can be across the form of each team, knowing who is more likely to create good newsworthy photos, and if there are any developing stories or milestones for individual players or coaches.
Code Replacement
Once I have set up my workstation. I get to work building code replacement lists for each team. Code replacements allow me to save time once the match starts by simply typing shortcodes into my caption, which Photo Mechanic or Caption Pro will convert into pre-populated player names or phrases. For example, ‘\rn\ \s\ \d\ \r3\‘ could become ‘Rafael Nadal serves during his Third Round Match‘

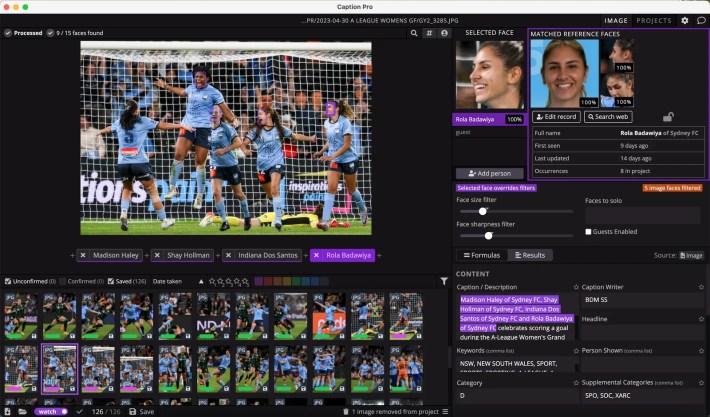
Facial Recognition
The most recent tool I’ve adopted into my workflow, and one that has arguably improved my edit and sending speed more than any other is Caption Pro. A powerful facial recognition software that continually grows a database of players and celebrities the more I use it.
I load profile photos of each team member into the software and pre load my caption using their code system which automatically loads player names into any caption.

Caption Pro has become an invaluable took in my sports photography workflow. I cover a variety of sports, often shooting new teams or players that I don’t recognise by sight, and the ability to rely on software to quickly and reliably identify players saves me hours on each edit. To read my full breakdown and review of the software, click here.
Ingesting
Once I’ve set up my caption information, I set up my card ingest paths on my laptop. Using the Photo Mechanic ingest tool, I set a folder to offload my images to, but at this stage I limit it to filter to ‘Copy Locked Photos Only’, this way, only photos that I mark on camera will be ingested, massively reducing the amount of images I have to look through once I’ve ingested my cards.

Camera Set Up
Pre-Release Capture
I shoot with two Nikon Z9’s and a Nikon Z6 (The Z6 is mostly used as a remote camera). Depending on the sport I am shooting, I have my Z9’s set to either 20 or 30fps to give me the best chance of catching the perfect action/reaction shot.
With fast moving sports where the action shot is fleeting (such as tennis) I use Nikon’s pre-release capture function to capture moments before I have pressed the shutter button. This is incredible helpful for capturing unpredictable emotion. For example, in tennis the most intense reaction is immediately as the point ends, so by the time I see it as a photographer, I would have already missed it, if not for the pre-release capture function.


A few examples of reaction shots captured with the help of Nikon’s pre-release capture function
Although this helps catch some moments that otherwise would have been missed, it does massively increase the amount of images I shoot, so during any breaks in play I review my images on the back of the camera and lock any images I think may be winners, so that the vast majority don’t get downloaded to my computer when I ingest.
**2024 UPDATE** After a bit of trial and error and discussions with Nikon, I have learnt that the pre-release capture function has a severe limitation, in so much as regardless of the speed of your memory card, the function can only shoot for a maximum of 3-4 seconds. The camera will then not fire any images until all the images have been written to your memory card, before you can then shoot again. This means if you use pre-release for a moment of action that is longer than 3-4 seconds, you will NOT be able to capture it all. To do this, you would be better served having the camera in normal high speed operation (pre-release capture disabled), so there is no impact on your buffer or shooting speeds.
For most sports using the pre-release capture is overkill and creates more work than it is worth, so I stick to 20fps which still generates more than enough options for most action.
Auto Focus
My autofocus settings vary depending on what sport I’m shooting or depending on what kind of image I am trying to capture. 99% of the time I will be using AF-C (continuous).
Solo Sports
For sports where I will only be focusing on one player/competitor at a time, and their movements will be erratic, such as tennis, I use 3D tracking with facial recognition. This works really well on the Nikon Z9’s to make sure the player I’m shooting remains in focus regardless of where in the court they are.
Team Sports
For team sports, I will normally jump between Dynamic Area AF – Medium and Large. This depends on which part of the field I am focusing on, medium for further away, so that I can focus the AF group on the main action I am following, and AF large for closer subjects), this creates a large enough AF area to help me focus on players running around the pitch, without fear of them moving so much that I won’t be able to keep tracking them.
Details
When looking to capture small details I will use either Dynamic Area Small, a single AF point, or sometimes, if its a moving detail that I’m looking to get I will use the 3D object tracking (without facial recognition). This allows me to focus on minute detail that would otherwise get missed by a wider AF area.

Files
To reduce file sizes and ingest time, most of the time when photographing sports I will shoot full resolution JPEG Fine rather than RAW, which outputs at 8256x5504px, leaving me a lot of room to crop in and still have enough detail for publishable images.


An example of an image taken from the far end of the pitch with the 45.7 megapixel Z9, with the outline showing the crop I delivered to my agency, and right, showing the edit used on the front page of the Sydney Morning Herald the next day, which still had enough detail in thanks to the large resolution.
As a result of shooting JPEG, it means I need to make sure my white balance is correct at all times. A real benefit of shooting with mirrorless cameras is that you can see the white balance in real time through your viewfinder – I find it much easier to make sure the colours are accurate as a result of this, but I will still constantly monitor between the camera and laptop monitor for any changes in lighting as the match progresses.
Selects
During a lull in play, or after a major piece of action (A goal or try), I will ingest my memory cards and quickly go through the images I locked in camera – If a goal or try has just been scored, getting photos of this out first is the priority, if I’m looking to file general action, I will pick the best action shots I have.

Edit
Once I have made my selection, I open the files in Adobe Camera Raw (ACR is a plug in for Photoshop, that works as a stand alone programme with all of the edit functionality of Lightroom) to do any crops and colour/exposure correction and then export.

Captioning
Once I’ve exported my images from ACR, they are automatically imported into Caption Pro using the watch folder functionality, from there I work through the images, checking that Caption Pro has correctly identified the people I want captioned, quickly double checking against the players reference photos before confirming their identities.


After I have finalised the names of the players in the image (deleting any that I don’t want mentioned by name, for example during a goal celebration, Caption Pro will ID every player in the frame, whereas I will most likely only name the goalscorer) I add any action information to the caption using my preloaded code replacement file (for example adding, x player tackles y player or x player scores a goal).
Now my captions are completed and ready to go, I send them via FTP using Caption Pro’s built in FTP functionality, or via another uploader depending on who my client is (It’s important to know how your client wants images to be delivered. Agencies such as Getty Images have their own in-house software, or other clients such as Publishd might want them delivered in a download link). Now I’m ready to get back to shooting, mere seconds after beginning the post production workflow.
Once the match is over I go back and ingest my entire cards, and go through the editing process again to make sure I haven’t missed any shots worthy of being sent. After all that, I pack up, go home, and back everything up.
And that’s it!
Let me know what you think, is there anything you do differently or would like to know more about? Let me know in the comments below!
Pingback: Facial Recognition will change your life! Caption Pro Review - The Photography Assistant
This is a great post and echoes much of the process I use, which has been evolving for years. I look forward, especially, to checking out Caption Pro. A couple of things I have found helpful recently that I didn’t see mentioned. During breaks in play (I mostly shoot college baseball), I use the delete series option to delete an entire burst of action I know doesn’t contain keepers (striking during a swing, an attempted but failed pick-off, etc.). This limits some of what I have to go through later.
Before I leave for a shoot, I insert and format two memory cards. Learned this the hard way, but without a battery and a card, this would not be possible, so it makes sure I don’t forget either of those crucial items.
Been experimenting with [Narrative | Photo culling | Blogging software | Photographers](https://narrative.so/) a bit for culling. The jury’s still out, but I like the idea.
Thanks for your tips! I have heard about the option to view and delete a series of images, I’ll have to give it a go, i’m sure it must be a time saver…
I’d be interested in hearing your thoughts on Narrative and AI culling for sports. I have used it once for a commercial shoot but didn’t really get into it, I need to go back and give it a proper go.
Pingback: Shooting the FIBA Women’s Basketball World Cup